LASER DaSH-IT · STEP BY STEP
Donors: What They Are, How to Choose One, and When to Save One
Use a proven reference to start closer to the look you want, while keeping the new photo and physical setup in view.
Screens captured from the current v1.8 development software. Feature names and availability may differ in the latest public installer. Screenshots illustrate software operation; they are not photographs of finished physical work. Updated October 14, 2026.
STEP 01 / 08
Understand the two uses of donor
In the engraving workflow, a donor is a saved reference look or recipe with context from another job. It can help establish a useful starting treatment. In an image-generation or sculpt workflow, a donor/reference picture supplies subject or visual guidance. These roles overlap in language but are not interchangeable: reference artwork does not prove laser settings, and loading a look does not guarantee exact subject likeness.
Checkpoint: You know whether your current tool is borrowing a processing look or using reference artwork.
STEP 02 / 08
Open Donor Library
Choose Studios → Donor Library. Read the list and the Proven material line. Use Check for New Donors if you want the library to look for available additions. The sample library is filtered to the current Wood context; your entries can differ.
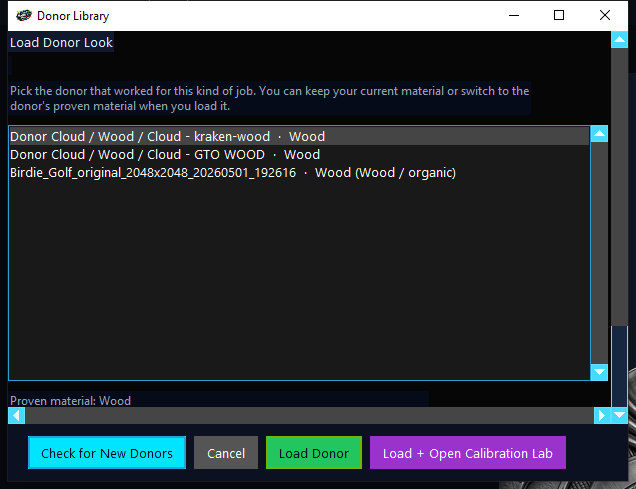
Checkpoint: You can identify both the selected donor and its material.
STEP 03 / 08
Choose by relevance, not by name alone
Start with a donor suited to the target material and a similar image problem: tonal structure, background, contrast and detail. A donor that worked on a bright portrait may be a poor starting point for a dark scene. Material compatibility matters before cosmetic resemblance. Review the donor’s context rather than assuming a successful result transfers to different hardware.
Checkpoint: The donor’s strengths address your new photo’s needs.
STEP 04 / 08
Load the donor and handle the material choice
Select the donor and click Load Donor. The workflow can let you keep the current material or switch to the donor’s proven material. Keep the actual substrate truthful: selecting another material name does not change the blank on your bed. After loading, recheck the job header and compare the treatment on your own source.
Checkpoint: Your original subject remains correct and the material still matches the physical job.
STEP 05 / 08
Use Load + Open Calibration Lab for a proof
When the material or job warrants it, choose Load + Open Calibration Lab. Compare candidate treatments and run a physical proof on your target material. Loading the donor is the beginning of the comparison, not the completion of calibration. Inspect face detail and useful tone separation on the actual sample.
Checkpoint: The selected look has been tested under your conditions before final production.
STEP 06 / 08
Refine without losing the reference
Apply the donor-based treatment, then make the smallest necessary tonal changes. Save the processed versions and attach physical feedback to the one actually burned. Linked trials preserve the starting donor and final edits so you can compare how the refinement changed the result.
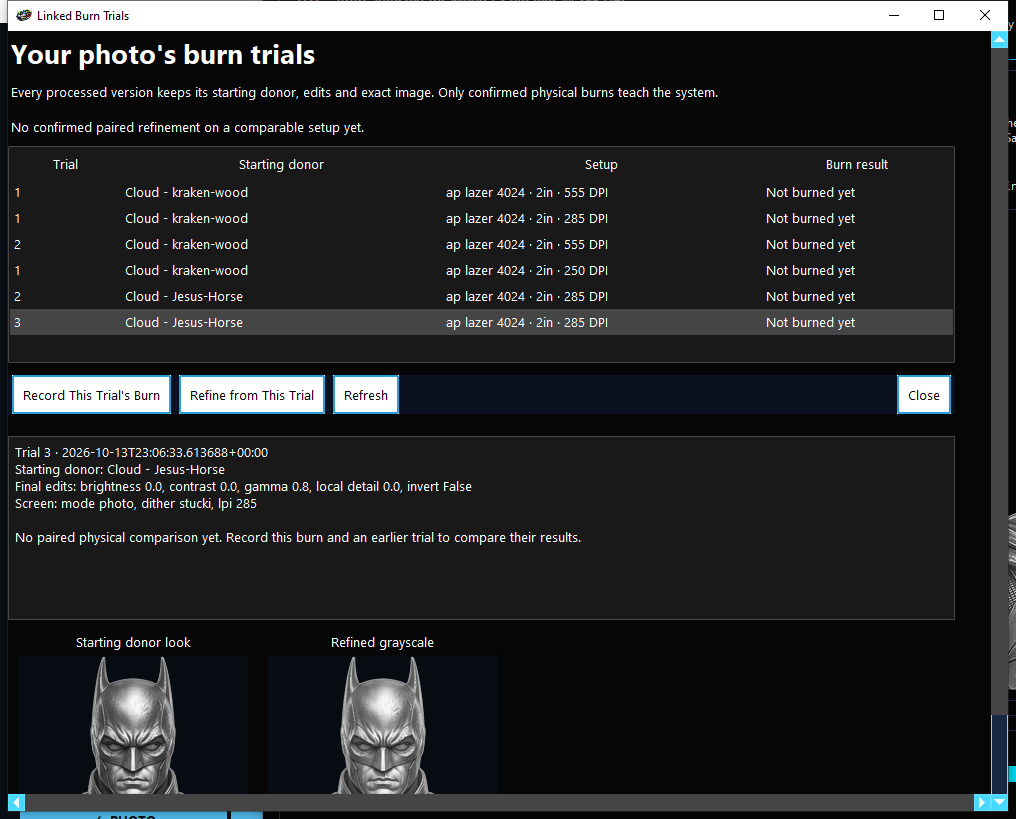
Checkpoint: You can distinguish the donor baseline from the refined version that worked.
STEP 07 / 08
Save a useful donor after success
After a real successful result, choose Studios → Save Current Donor. Use a descriptive name with the subject/look and material, and complete the context offered by the save dialog. Save a reproducible reference, not a random attractive preview. Keep the source, winning export and actual run details with the project so the success remains understandable later.
Checkpoint: A future operator can tell what the donor represents and where it was proved.
STEP 08 / 08
Use artwork donors deliberately
When a generator or relief tool asks for a donor image, choose a clean reference of the intended subject and verify the filename. For identity-oriented sculpt modes, add the requested extra views and inspect the generated artwork and actual geometry before export. Those references help guide generation; they do not certify exact 3D fidelity or physical burn performance.
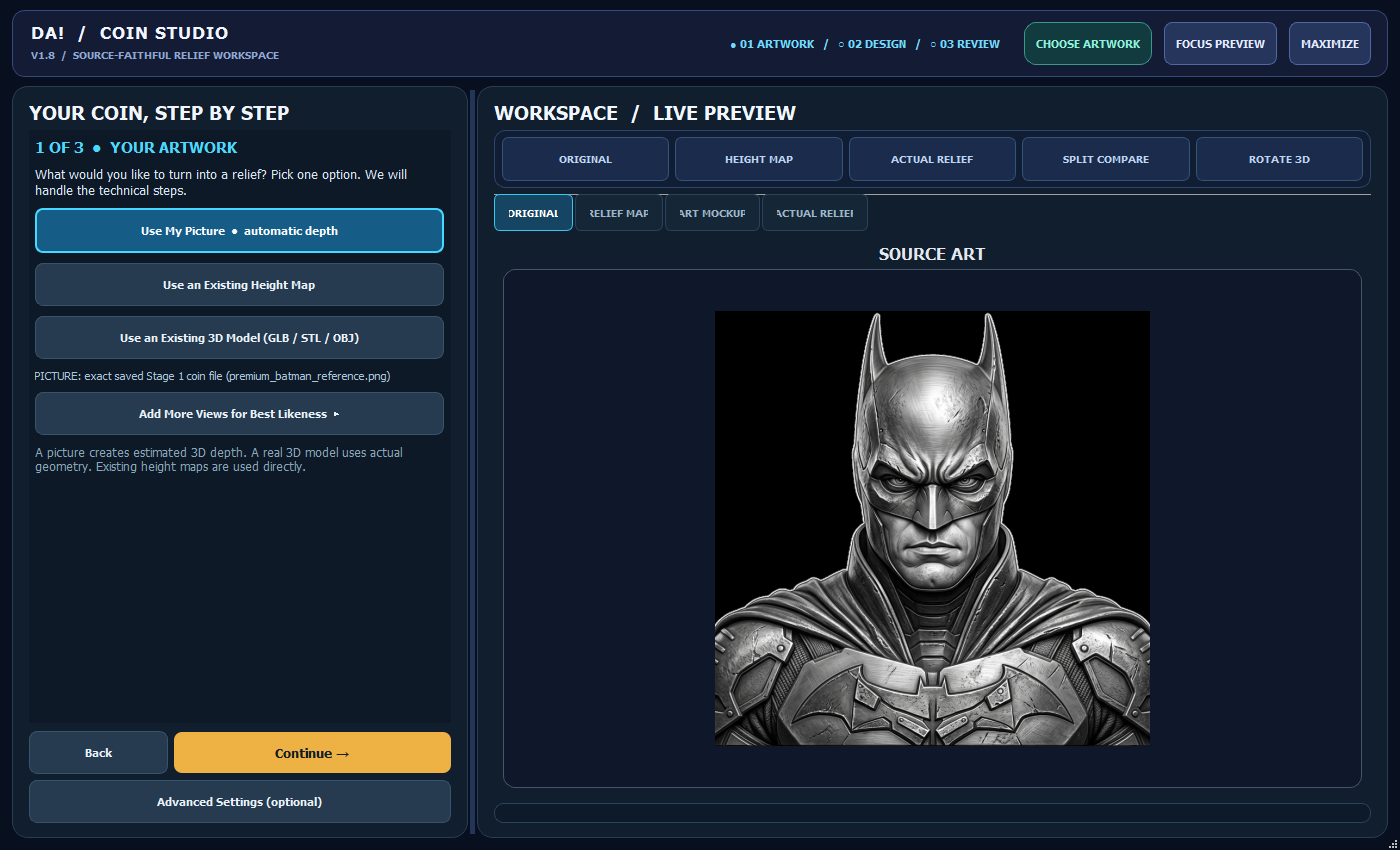
Checkpoint: The reference is appropriate to the artistic task, and its role is separate from burn evidence.